Rubik-Würfel Rubik’s Cube
Auf dieser Seite zeige ich, wie man einen Rubik-Würfel mit Hilfe des Standard-Algorithmus in nur sechs Schritten löst. Die Standard-Methode beruht darauf, die drei Ebenen des Würfels der Reihe nach zu lösen, beginnend mit der obersten Ebene. Die dazu nötigen Schritte sind mit einfachen Pfeil-Symbolen notiert:
← / → Rotation der oberen oder unteren Ebene nach links / rechts
↑ / ↓ Rotation der linken oder rechten Ebene nach oben / unten
↻ / ↺ Rotation der vorderen Ebene im / gegen den Uhrzeigersinn
Zwar ist die Standard-Methode nicht die schnellste Möglichkeit, den Würfel zu lösen, jedoch ist der Algorithmus universell und erlaubt es, den Würfel aus jeder beliebigen Ausgangssituation heraus zu lösen.
On this page I provide instructions on how to solve Rubik’s Cube in just six steps using the standard algorithm. The standard method is based on solving the three layers of the cube one after the other, starting with the uppermost layer. The required steps are described using basic arrow symbols:
← / → Left / right rotation of the top or bottom layer
↑ / ↓ Upward / downward rotation of the left or right layer
↻ / ↺ Clockwise / anticlockwise rotation of the front layer
While the standard method is not the fastest way of solving the cube, it is universal and allows the cube to be solved irrespective of its initial configuration.
1. Obere Ebene lösen Solving the upper layer
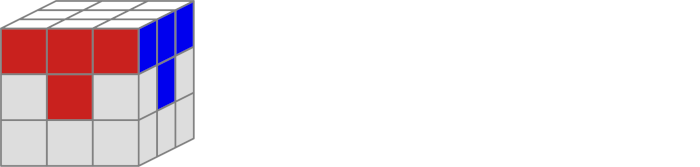
Im ersten Schritt wird die obere Ebene dergestalt gelöst, daß die weiße Seite nach oben weist und die Farben der obersten Ebene korrekt angeordnet sind und zu den mittleren Feldern passen. Auf den vier umliegenden Seiten des Würfels müssen sich anschließend vier T-förmige Muster in den Farben rot, blau, grün und orange befinden, so wie im Bild gezeigt. Dieser erste Schritt läßt sich recht einfach intuitiv lösen, so daß auf die Angabe einer formalen Lösung hier verzichtet sei.
In the first step, the upper layer of the cube needs to be solved such that the white side faces up and all of the colours of the upper layer are correctly oriented and match the colours of the central fields. The four surrounding sides should then contain four T-shaped patterns in the colours red, blue, green and orange, as shown in the image. This first step can be carried out intuitively without too much trouble. Hence, a formal solution shall not be given here.
2. Mittlere Ebene lösen Solving the middle layer

Im zweiten Schritt wird die mittlere Ebene komplettiert. Dazu müssen die noch fehlenden Felder an den Rändern der mittleren Ebene aus der unteren Ebene nach oben rotiert werden. Man rotiert hierfür zunächst die untere Ebene so, daß sich ein Feld der zur Seite passenden Farbe mittig unter dem zentralen Feld befindet. Dieses Feld muß dann entweder nach oben links oder nach oben rechts rotiert werden, je nachdem welche Farbe sich auf der Unterseite des Feldes befindet. Je nach Farbe der Unterseite muß also einer der beiden oben gezeigten Algorithmen ausgeführt werden. Im Anschluß befindet sich das Feld an der richtigen Position am rechten oder linken Rand der mittleren Ebene und sollte auch auf der benachbarten Seite die passende Farbe aufweisen. Dieser Schritt muß so lange wiederholt werden, bis alle Farben der mittleren Ebene an der richtigen Position sind und somit auch die mittlere Ebene vollständig gelöst ist. Sollte ein Fehler unterlaufen sein, einfach den Algorithmus noch einmal ausführen, um das betroffene Element für einen erneuten Versuch wieder in die untere Ebene zurück zu versetzen.
In the second step, the middle layer needs to be completed. To achieve this, the matching edge fields currently missing from the middle layer need to be shifted upwards from the bottom layer. One first needs to rotate the bottom layer until a field of the matching colour is located right below the centre field. This field then needs to be rotated either to the upper-left or to the upper-right, depending on the colour on the underside of that field. Hence, depending on the underside colour, one of the two algorithms shown above must be carried out. Afterwards, the field should be located in the right place on the left or right edge of the middle layer, and its colour on the adjacent side should also match. This step must be repeated until all of the colours of the middle layer are at their correct position and hence the middle layer, too, is completely solved. Should an error occur, simply repeat the algorithm to move the affected piece back to the bottom layer and then try again to rotate it into the correct position.
3. Gelbes Kreuz Yellwo cross

Im dritten Schritt muß der Würfel umgedreht werden, so daß nun die Seite mit dem gelben Zentralfeld nach oben weist, während die bereits gelöste weiße Seite nach unten zeigt. Das nächste Ziel ist es nun, allen vier Randfeldern der gelben Seite die korrekte Farbe (gelb) zuzuweisen, so daß ein gelbes Kreuz entsteht. Dazu muß der obige Algorithmus dreimal hintereinander ausgeführt werden. Nach der ersten Ausführung sollten zwei benachbarte Randfelder gelb sein und somit ein L-förmiges gelbes Muster entstehen, so wie im Bild oben rechts. Nach der zweiten Ausführung des Algorithmus sollten stattdessen zwei gegenüberliegende Randfelder gelb sein, so wie in der Abbildung unten links gezeigt. Nach der dritten und letzten Ausführung sind dann alle vier Randfelder gelb, und wir erhalten ein gelbes Kreuz so wie in der Abbildung unten rechts.
Vorsicht: Vor jeder Ausführung des Algorithmus muß darauf geachtet werden, daß die gelbe Figur auf der Oberseite exakt so ausgerichtet ist, wie in den Abbildungen gezeigt. Dazu muß der gesamte Würfel gegebenenfalls gedreht werden, bevor mit der nächsten Ausführung des Algorithmus fortgefahren wird. Es ist auch durchaus möglich, daß zu Beginn bereits ein vollständigeres gelbes Muster zu sehen ist. In diesem Fall ganügen dann mitunter bereits weniger als drei Ausführungen des Algorithmus, um das gelbe Kreuz auf der Oberseite zu erreichen. Auch ist es möglich, daß das gelbe Muster komplexer ist, als in den Bildern gezeigt. Beispielsweise könnten bereits drei Randfelder gelb sein, so daß sich ein T-förmiges Muster ergibt. Das macht aber nichts, denn der Querbalken des T entspricht dann der Situation in der Abbildung unten links, so daß an dieser Stelle fortgefahren werden kann. Sollte sich ein Fehler einschleichen, einfach den Würfel wieder so wie gezeigt ausrichten und mit der nächsten Ausführung des Algorithmus fortfahren.
In the third step, the cube must be turned around such that the side with the yellow centre is pointing up while the already solved white side is facing down. The next step is to assign the correct colour (yellow) to all four edge fields of the yellow side, effectively creating a yellow cross. To achieve this, the algorithm shown above must be executed three times. After the first execution, two neighbouring edge fields should be yellow, thus creating an L-shaped pattern as illustrated in the upper-right picture above. After executing the algorithm a second time, two opposite edge fields should be yellow, as shown in the picture on the bottom-left. After the third and last execution of the algorithm, all four edge fields should be yellow, thus forming a yellow cross, as illustrated in the bottom-right picture.
Caution: Before each execution of the algorithm we must ensure that the yellow pattern on the upperside is oriented in exactly the same way as shown in the pictures. The entire cube may need to be turned accordingly before progressing with the next execution of the algorithm. It is possible that a more complete yellow pattern is already visible at the start, in which case fewer than three executions of the algorithm may be sufficient to produce the yellow cross. It is also possible that the yellow pattern on the upperside is more complex than shown in the pictures. As an example, three of the edge fields could already be yellow rather than just two, thus creating a T-shaped pattern. However, this doesn’t really bother us too much, as the horizontal bar of the T corresponds to the situation of having two opposite yellow fields, as shown in the bottom-left picture, and we can simply proceed with that step. If you make a mistake, simply reorient the cube as shown in the pictures and carry on with the algorithm.
4. Die oberen Randfelder The upper edge fields

Im vorherigen Schritt haben wir zwar ein gelbes Kreuz erzeugt, aber die Farben der oberen Randfelder auf den vier umliegenden Seiten sind mitunter noch falsch. Daher müssen wir im vierten Schritt diese Felder so lange paarweise vertauschen, bis alle vier umliegenden Seiten (rot, blau, grün und orange) die korrekte Farbe auf dem oberen Randfeld aufweisen. Dies wird mit dem oben gezeigten Algorithmus erreicht, durch den die Position des oberen Randfeldes auf der Vordeseite mit jenem der nach links weisenden Seite vertauscht wird. Dies muß für alle betroffenen Seiten so lange wiederholt werden, bis alle vier Seiten die passende Farbe im oberen Randfeld haben.
In the previous step, we had generated a yellow cross on the upperside, but the colours of the upper edge fields on the adjacent four sides may still be incorrect at this stage. Hence, in the fourth step, we need to swap these fields pairwise until all of the adjacent sides (red, blue, green and orange) show the correct colour in their upper edge field. This can be achieved with the algorithm shown above which swaps the position of the upper edge field on the side facing towards us with the respective field on the left-facing side. This procedure must be repeated for all affected sides of the cube until all four sides have the correct colour in their upper edge field.
5. Die oberen Ecken The upper corners

Im fünften Schritt müssen die oberen Ecksteine so lange ihre Position wechseln, bis alle vier Ecken die drei richtigen Farben aufweisen. Dies wird durch den oben gezeigten Algorithmus erreicht, durch den drei der vier Ecken (hinten rechts, hinten links und vorn links) ihre Positionen in der durch die roten Pfeile angedeuteten Weise wechseln. Dieser Algorithmus muß so lange wiederholt werden (gegebenenfalls durch zwischenzeitliche Nauausrichtung des Würfels), bis alle vier Ecken ihre jeweils drei passenden Farben ausweisen. Es ist dabei unerheblich, ob die Ecken bereits korrekt ausgerichtet sind; lediglich die Farben müssen die richtigen sein. Die korrekte Ausrichtung jeder Ecke erfolgt erst im nächsten Schritt.
In the fifth step, the upper corner pieces must swap their positions until all four corners have the correct three colours. This can be achieved with the algorithm shown above which results in three of the four corners (both far-side corners and the left corner on the near side) swapping their positions in the way indicated by the red arrows. This algorithm must be repeated (with reorientation of the cube if necessary) until all four corners have their three matching colours. At this stage, it does not matter if the orientation of each corner is wrong for as long as their three colours are the correct ones; we will adjust the orientation of the corners in the subsequent step.
6. Rotieren der oberen Ecken Rotation of the upper corners

Im sechsten und letzten Schritt müssen die oberen Ecken durch Rotation korrekt ausgerichtet werden. Obwohl der hierfür benötigte Algorithmus recht einfach anmutet, ist dieser Schritt der mit Abstand schwierigste und heikelste, da durch die geringste Unachtsamkeit der gesamte Würfel wieder völlig durcheinander gerät. Es sind daher folgende Punkte dringend zu beachten:
- Der Würfel muß zu Beginn so ausgerichtet werden, daß sich eine der zu rotierenden Ecken auf der dem Beobachter zugewandten Seite oben rechts befindet (siehe Abbildung).
- Der obige Algorithmus muß exakt dreimal hintereinander ausgeführt werden.
- Unter keinen Umständen darf die Ausrichtung des Würfels während der dreifachen Ausführung des Algorithmus verändert werden! Es muß also immer dieselbe Seite dem Beobachter zugewandt bleiben.
- Sollte bereits nach der ersten oder zweiten Ausführung des Algorithmus die rechte obere Ecke korrekt ausgerichtet sein, so muß eine andere Ecke, die noch falsch ausgerichtet ist, an ihre Position gedreht werden. Dazu ist ausschließlich die obere Ebene so zu drehen, daß eine neue Ecke, die der Ausrichtung bedarf, an die obere rechte Position rückt. Dies darf nur durch Drehen der oberen Ebene (egal ob im oder gegen den Uhrzeigersinn) erreicht werden; unter keinen Umständen darf die Ausrichtung der mittleren oder unteren Ebene relativ zum Betrachter verändert werden!
- Während der dreifachen Ausführung des Algorithmus wird der Würfel scheinbar wieder komplett durcheinander geworfen. Erst nach exakt drei Ausführungen erscheint der Würfel wieder geordnet. Man darf sich dadurch nicht verunsichern lassen und muß streng darauf achten, daß der Würfel seine Ausrichtung so lange beibehält, bis alle drei Ausführungen des Algorithmus vollständig abgeschlossen sind. Erst danach kann der Würfel wieder sicher gehandhabt werden.
- Sollten auch nach drei Ausführungen des Algorithmus noch Ecken vorhanden sein, deren Ausrichtung falsch ist, so muß der gesamte Schritt 6 für die noch falsch ausgerichteten Ecken wiederholt werden, das heißt es muß der Algorithmus gemäß dieser Anleitung noch weitere drei Male ausgeführt werden.
Sollte nach dreimaliger Ausführung des obigen Algorithmus der Würfel nicht mehr geordnet sein, so ist entweder ein Fehler bei der Ausführung des Algorithmus passiert oder der Würfel wurde während der dreimaligen Ausführung des Algorithmus versehentlich gedreht. In diesem Falle muß leider das Lösen des Würfels wieder von vorn mit Schritt 1 begonnen werden. Andernfalls Glückwunsch: der Würfel sollte nun gelöst sein!
In the sixth and final step, the upper corner pieces need to be rotated to ensure that they have the correct orientation. While the required algorithm looks fairly straightforward, this last step is by far the most complex and precarious one, as the slightest mistake will result in the cube getting completely messed up again. It is therefore critical to strictly adhere to the following instructions:
- At the beginning, the cube must be oriented such that one of the corners to be rotated is located in the upper-right position of the side facing the viewer (see picture).
- The algorithm shown above must be executed exactly three times in a row.
- Under no circumstances must the orientation of the cube be changed during the three executions of the algorithm! In other words, the same side of the cube must be facing the viewer at all times.
- Should the upper-right corner already be correctly oriented after just one or two iterations of the algorithm then a different corner, which still has the incorrect orientation, must take its place. To achieve this, only the upper layer of the cube must be rotated until a corner requiring reorientation ends up in the upper-right position. It is critical to only rotate the upper layer (either clockwise or anticlockwise); under no circumstances must the orientation of the middle and bottom layers relative to the viewer be altered!
- During the three executions of the algorithm, the cube appears to get completely messed up again. Only after completion of the third iteration does the cube appear ordered again. It is important to not get confused by this and continue maintaining the same orientation of the cube throughout the process until all three iterations of the algorithm have been completed. Only thereafter can the cube be safely handled again.
- If there are incorrectly oriented corners left even after three iterations of the algorithm then the entire step 6 must be repeated for the affected corners. Hence, the algorithm must be executed another three times in accordance with this instruction.
If, after three executions of the algorithm described above, the cube is not ordered any longer then either an error was made in the execution of the algorithm, or the orientation of the cube was accidentally changed during the three iterations of the algorithm. Unfortunately, the entire cube will need to be solved from scratch in this case, starting with step 1. Otherwise congratulations: the cube should now be solved!